Knowledge Base
CoxBox 08 and 88 / CoxBox Mini
CoxBox Instruction Manuals
 CB 84/88 Operation, Maintenance & Troubleshooting Guide
(Size: 951.9 KB)
Cox Box / Megaphone Battery Guide
(Size: 77.2 KB)
CoxBox Mini
(Size: 794.6 KB)
CB 84/88 Operation, Maintenance & Troubleshooting Guide
(Size: 951.9 KB)
Cox Box / Megaphone Battery Guide
(Size: 77.2 KB)
CoxBox Mini
(Size: 794.6 KB)
 CoxBox Panel Protector Installation Instructions
(Size: 325.5 KB)
CoxBox Panel Protector Installation Instructions
(Size: 325.5 KB)
CoxBox Boat Wiring
Harness Module A-DB Dragon Boat
(Size: 274 KB)
Harness Module M Speaker Extension
(Size: 257.3 KB)
Harness Module R Rate Sensor
(Size: 253.7 KB)
CoxBox Troubleshooting Documents
CoxBox Customer Operation and Diagnostic Guide
(Size: 97.9 KB)
CoxBox Wiring Harness Repair "Pigtail" (Part # 3032)
(Size: 60.1 KB)
Hi Deg Errors when charging the Cox Box
(Size: 453.3 KB)
MSDS for CoxBox 08 and Blue Ocean Megaphone batteries
(Size: 36.7 KB)
Testing CoxBox Wiring in an 8 with a Multimeter
(Size: 2.3 MB)
With increased airport security, traveling with your CoxBox is trickier than ever. We recommend you check the CoxBox in with your luggage. Include product literature that explains what the CoxBox is. Brochures can be obtained from NK, or product literature can be printed from the website. Another option that may work when traveling overseas is to ship your units through UPS. If you do so, be very clear that these are used units, being imported temporarily. Put a low replacement value on them, but do note that you run the risk of the replacement value being used for customs. VAT (tax) is quite expensive and if they decide to hold the units in customs until you pay you could be without your CoxBox for the race.
... PermalinkCoxBox Boat Wiring
Harness Module A-DB Dragon Boat
(Size: 274 KB)
Harness Module M Speaker Extension
(Size: 257.3 KB)
Harness Module R Rate Sensor
(Size: 253.7 KB)
Hi Deg Errors when charging the Cox Box
(Size: 453.3 KB)
Please see the guidance shown here:
How can I submit a tax-exempt order through the website?
(Size: 860.7 KB)
-
Is the CoxBox being charged correctly?
- The battery should reach 100% FULL on the screen. Charging fully should not take longer than 10 hours.
-
Is the correct charger being used?
- Our chargers are rated 12VDC and 300mA and are sent to the user with a special plug attached. We recommend that all chargers be purchased from NK, and that you do not modify a charger purchased elsewhere for use with a CoxBox.The old style and new style CoxBox chargers are interchangeable.
-
Is the charger working?
- CoxBox charges without any errors displayed on the screen.
-
Does the unit charge with a different charger? If so, then the first charger is bad. If you suspect that your charger is not working correctly you can perform the following test:
- Obtain a multimeter—almost any type will do. Turn the multimeter on and set it at 20 VDC. After plugging the charger in (be VERY careful, the charger is ON!), place the positive lead from the multimeter on the plus pin, and the negative lead from the multimeter onto the ground pin. The multimeter should read between 13.5V -15V. Any deviation from this range indicates that the charger is not working. If you do not get any voltage reading on the multi-meter, the internal transformer is damaged the charger must be replaced.
- If the charger is not working correctly and you did get a voltage reading, it is probable that one of the pins has become disconnected or misaligned. Pins usually become misaligned due to debris in the plug—it is important to keep the plugs clean.

-
Why am I getting a charging error?
-
First you need to determine whether this is in an issue with the battery or with the CoxBox itself by swapping components.
If the error follows the CoxBox first try cleaning all of the sockets using the CoxBox maintenance kit. Try charging again to see if this resolved the issue. If the error persists contact NK and we will work with you to get your unit repaired. Techsupport@nkhome.com
If the error follows the battery, please try re-balancing your battery. If the error persists contact our technical support team at Techsupport@nkhome.com
-
First you need to determine whether this is in an issue with the battery or with the CoxBox itself by swapping components.
-
-
Have the batteries exceeded their lifespan?
- A CoxBox Battery is expected to provide 3 years of normal use (daily practices for approximately six to nine months of the year). If you know your unit’s batteries are older than three years, we recommend that the unit be returned to NK for new batteries and servicing. We can often check our records to determine the age of your unit’s batteries.
-
Is the switch in the HOLD position?
- If the toggle switch is in the HOLD (top) position, the unit will not read. Place the switch in the RUN (middle) position.
-
Is there a problem with the unit?
-
When there is no reading or there are irregular readings, the problem usually lies with the sensor, not the unit itself. To test the unit:
- Turn the unit on; clear the memory and place in ready mode.
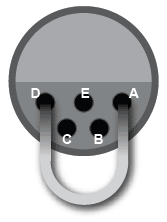
- Using a pair of tweezers or a bent paperclip (unfolded into a “U” shape) gently poke into the two exterior holes of the CB plug (“A” & “D” sockets of the P5).
- The stroke rate should update every other poke. If this happens, the Cox-Box is functioning properly and the problem exists with the rate sensor in the wiring harness. Order a replacement rate sensor (NK Part No. 0293) and install it according to the directions supplied.
- If the rate does not update during this test, check the sockets to confirm that they are the same height within the plug and have not been pushed into the plug. If the sockets have become recessed, gently use a pair of needle-nose pliers to work the socket out to the same level as the other sockets.
- Use the Audio System Maintenance Kit (NK Part No. 0230) to clean any imbedded dirt or debris from the sockets and inject a small amount of Nyogel into the sockets to prevent corrosion and ensure good electrical contact.
- If the charger is not working correctly and you did get a voltage reading, it is probable that one of the pins has become disconnected or misaligned. Pins usually become misaligned due to debris in the plug—it is important to keep the plugs clean.
-
When there is no reading or there are irregular readings, the problem usually lies with the sensor, not the unit itself. To test the unit:
-
Is the wiring intact?
- Check the wiring for pin alignment and cuts or nicks. Check the sensor and seat magnet placement for proper positioning and security. Clean all of the sockets and pins using the Audio System Maintenance Kit (NK Part No. 0230). Ensure all connections are tightly sealed to prevent water entry.
(Only needed for CoxBox Battery Packs Pre-August 2014)
NK recommends rebalancing your Cox Box battery twice a year. If you have not done so recently, this is a good time to re-balance them prior to winter storage. This procedure is also recommended for Cox Box Minis and Blue Ocean Batteries.
Steps to Re-balance:
- Run the unit until the battery dies. Generating audio while the unit is running will assist in draining the battery. Otherwise turn the units on and set them dark room so that the backlight is activated to cut down on time to drain the battery.
- After battery is drained, WAIT 2 DAYS to allow any remaining charge to drain out of the battery.
- After 2 days, recharge the batteries until they reach FULL. This will re-balance the cells in the battery and ensure they are ready to go for future use.
... Permalink
Note:NK recommends troubleshooting any boat harness issues by substituting known “good” equipment in place, one at a time, to determine the location of the failed equipment.
See the following document for details on testing the Harnesses and speakers:
Testing CoxBox Wiring in an 8 with a Multimeter
(Size: 2.3 MB)
-
Is the wiring clean of cuts or nicks?
- Cuts or nicks in the wiring are the most frequent causes of audio problems. Be sure that all of the connectors (pins, sockets, plugs, receptacles) are not damaged and are positioned properly.
-
Is the microphone working properly?
- The microphone may be the cause of failure. It is the most delicate component of the CB system. Test the system with a microphone you know is good. Note: A damaged microphone often causes static.
-
Are the speakers working properly?
- Be sure all of the speakers are plugged in properly and are in working order (replace one at a time with a known good speaker to test). If you are getting a loud squealing noise, try pointing the speakers away from the coxswain to minimize feedback.
-
Is the audio signal balanced?
- f you are familiar with how to use an ohmmeter, you can verify if the audio signal of the CB is balanced. Measure from the ground socket “A” to the audio socket “B”. It should read approximately 3.1 volts. Measure from the ground socket “A” to audio socket “C” it should read the same as “A” to “B”. If they are not balanced, return the unit to NK.
Never attempt to repair the CoxBox unit yourself. The units are specially sealed to make them watertight. Breaking this seal often causes very expensive damage and will void the warranty.
... PermalinkNielsen-Kellerman has been around since 1978. Our roots are in the sport of rowing, and we have been building performance products for athletes of all levels since the beginning. Year after year, we have created newer and better products for our customers, including novice coxswains, Olympic athletes, college coaches, masters rowers, and everyone else in between. Some of our products including the SpeedCoach family, have crossover unto other paddle sports(outriggers, dragon boats, canoes, kayaks, and stand up paddle boards). We have worked closely with partners and customers within the paddling community to make the best product we can. We are always open to new ideas and ways to make the products a better tool for your training, fitness, and racing needs.
... Permalink
Cox Box / Megaphone Battery Guide
(Size: 77.2 KB)
Tips for Avoiding the Spread of Viruses & Bacteria with Shared NK Equipment
We have been asked what is the best way to help prevent potential cross-contamination when using NK Equipment. While NK is not claiming these techniques will be 100% effective against a virus spreading, here are a couple of ideas that may help.
1) When sharing microphones, purchasing a set of finger cots to put on the end of the microphone creates a barrier between the mic and the user's mouth. The finger cot should not affect the overall sound amplification and can be removed after use and then a new one reapplied for the next user. They can be found online or even at your local Walgreens.
2) Use a 10% Bleach and 90% water solution to sanitize all the equipment. This solution is very effective against killing all types of viruses and should not harm the plastics or rubber used in our equipment.
You will first need to create an account if you do not already have one. After you create an account, sign in. Click on your account name at the top of the page and select My Account. On the left of the screen, you will see Product Registration, select this option. Enter your purchase date, serial number and product name into the fields and then select Save.
... Permalink